Overview
OP5 Monitor can receive standard SNMP traps. Adding the SNMP rule based trap handler to your OP5 Monitor provides an advanced tool for processing traps, including:
- Storing traps in a local database, which allows intelligent handling of filters and rules.
- Handling status changes, such as noting a status change when complex rules or user intervention request the change.
- Building your own filters and rules. For example:
- If trap A arrives within X minutes of receiving trap B, then the object's status is not OK; otherwise receiving trap A sets the status to OK.
- Saving status states between multiple traps.
- Handling traps as passive checks within OP5 Monitor.
- Storing alarms and events, thereby tracking them for various reports (SLA, event, and availability reports).
We use the terms trap from SNMP v1 and notification from SNMP v2 interchangeably, except where it is stated explicitly. For the sake of readability, we also use shortened, fake examples of SNMP OIDs, for example: .1.1, .1.2, .1.3. You need to substitute real OIDs in your own implementation.
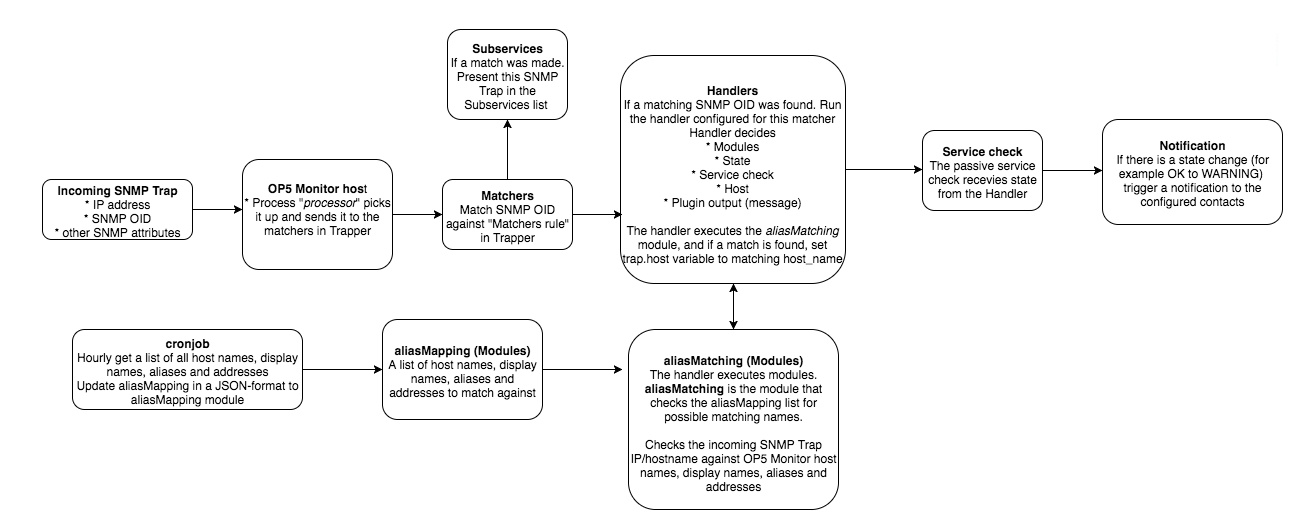
Example flow
The diagram below shows a flow all the way from the incoming trap through hostname matching functions to notification in Slack.
Licence
To use the Trapper extension you need a Trapper licence, which you can purchase from ITRS. After you install the new licence, run the following command:
# mon restart

Quick start
This is a quick overview of the steps to create a Trapper trap, which are described in later sections in more detail. You need at least one handler before you can create any matchers. In other words, you need a Lua script to handle incoming SNMP data before the matchers can act on the data.
To create a trap:
- Create a new Lua file and set values for the required parameters. You can create it as a normal text file, and the contents can be as simple as the single line in the example below. We provide more advanced examples in Handlers.
- Upload the handler, as follows:
- From OP5 Monitor, go to Monitor > Trapper, then click the Handlers button in the list view banner. You can also use the URL
https://<op5_server>/monitor/index.php/listview?q=%5Btrap_handlers%5D%20all#, replacing<op5_server>with your OP5 Monitor FQDN. - Click New Handler. A pop-up dialogue opens on the same page.
- Enter a name for the handler and select the handler to upload.
- Click Upload handler to start the upload.
- Create a new matcher, as follows:
- Click the Matchers button to get the Matchers list view.
- Click New Matcher from the banner.
- Select the handler from the Handler drop-down list.
- Click Create matcher.
- Test the new matcher or handler, as follows:
- Click the Subservices button.
- Click Trigger test trap.
- Enter the information requested by the pop-up. The information you need to specify is explained in more detail later.
- Click Send trap.
result.state = STATE.WARNING

Note the line of text at the bottom of the dialogue. This is the command-line snmptrap syntax generated by the fields above it. The default syntax before any entries would read:
snmptrap -Le -c public localhost -v2c i
The results from these screen shots will read:
snmptrap -Le -c public localhost -v2c .1.3.6.1.6.3.1.1.5.6 .1.3 s heyhowdy
Matchers
Note: The handler must be created before the matcher.
A matcher is a rule that defines which trap is to be processed by which handler. A trap matcher maps a handler to an OID (object identifier). You can use a full OID, you can use an asterisk as a wildcard, or you can use the string fallback to only run your matcher when there are no matching, non-fallback matchers.
Example: .1.3.6.1.*
Keep in mind that a trap can be matched to more than one matcher. Fallback is only used if it is impossible to match the trap with any of the other matchers.
Handlers
A handler is a rule that defines what to do when an OID is matched by a matcher.
| Parameter | Description |
|---|---|
result.host
|
Host name must match an existing host. |
result.message
|
Status information. |
result.notify
|
Updates a passive service check even if there is no state change. It is recommended to enable this feature if the notification text changes even if the state remains the same. The available options are:
NOTIFY.ALWAYSNOTIFY.NEW_STATE |
result.service
|
Service description. Needs to match an existing service in order to be mapped to that service and visible outside Trapper. |
result.state
|
Sets the event state.
This parameter is mandatory.
The available states are:
STATE.OKSTATE.WARNINGSTATE.CRITICAL |
| OID Variable | Value |
|---|---|
|
|
Trap variable bindings in a key-value form.
An alternative, shorter syntax to access |
|
|
The host that sent the trap. |
|
|
The OID of the trap. |
|
|
Trap date and time in time format. |
|
|
Hour |
|
|
Minute |
|
|
Second |
trap.date.year
|
Year |
trap.date.month
|
Month |
trap.date.day
|
Day |
trap.date.weekday
|
The number of a day in a week, starting from Sunday. |
Context
Variables used in handlers (as well as trap and result structures) exist in the scope of one handler call. Their values do not persist across different handler calls, even between calls done while processing the same trap, for example, when the same handler matches the same trap several times. If you need to retain values between different trap calls , you can use the special associative array context:
context[ "name" ] = <value>
To retrieve the saved value, refer to the context with the same key:
var = context[ "name" ] or <default value>
You can see examples of code containing context variables in Code examples .
Actions
| Action | Description |
|---|---|
action.reject()
|
Stop processing this trap by this and all following handlers and drop it. |
action.ignore()
|
Stop processing this trap by this handler and proceed to next handler, if any. |
action.done()
|
Stop the handler normally; useful for returning from deep nested constructions. |
Example 1 - Basic handler
This is a very basic handler that will set the state to critical. result.state is the only mandatory parameter.
result.state=STATE.CRITICAL
Example 2 - Conditional state including historical data
A device periodically sends a trap with the OID .1.1, with its temperature in variable binding .10.10. A temperature below 40 is considered OK and above 100 a problem. Between 40 and 100, we want the state to be warning if the temperature increases and OK if it decreases.
result.service = "Temperature"
t = trap.fields[ ".10.10" ]
if t < 40 then
result.state = STATE.OK
elseif t > 100 then
result.state = STATE.CRITICAL
else
prev_t = context[ "temperature" ] or 0
 if t > prev_t then
      result.sate = STATE.WARNING
else
      result.state = STATE.OK
  end
end
context[ "temperature" ] = t
Example 3 - Multiple occurrences
A device can send us a trap with the OID .1.1. When this trap is received, the service Detections normally changes state to warning, but if 3 such traps are received within two minutes the service state needs to change to critical.
result.service = "Detections"
time_prev_prev = context[ "prev-prev" ] or 0
time_prev = context[ "prev" ] or 0
time = trap.timestamp
if time - time_prev_prev < 120 then
result.state = CRITICAL
else
result.state = WARNING
end
context[ "prev-prev" ] = time_prev
context[ "prev" ] = time
The timestamps of two previously received traps are used to calculate the time difference. At the end the handler updates the timestamps.
Modules
Including module-name in a handler has the same effect as including the body of the module module-name in the handler. This can be useful when multiple handlers share identical code sections.
Note that you cannot define modules in the exact same way as in regular Lua code. Every module is saved separately in the database, and you must use the include("your_module") syntax, where your_module refers to a module that has been previously uploaded.
To list all your modules, you can run mysql -D trapper -e "select name from modules", or traped list modules, from the command line.
Language
Handlers DSL is created on top of a subset of the Lua programming language. The Lua Reference Manual is a good source if you need more information about the language.
Note that handlers run in separate secure sandboxes, and potentially dangerous functionality, like access to the file system, will not be available.
Please note that comments in Lua have the following syntax:
-- This is a one-line comment.
-- Here is another one-line comment.
--[[
In contrast,
this is a multi-line comment;
--]]
Map to service
In addition to result.state the following parameters are also mandatory:
result-service— the service in Trapper must have exactly the same name as the service on the node. You might need a specific script if the node name shows up as an IP address in Trapper.result.message
A service must either already exist on the host that generates the traps or you need to create it if the traps need to be visible outside Trapper:
service_description— must exactly map the value used forresult.service.check_command=bizproc_pasactive_checks_enabled= Nopassive_checks_enabled= Yesmax_check_attempts= 1