Overview
The easiest way to configure your OP5 Monitor system on OP5 Appliance System is to use the web interface at https://<your ip>/ and click Configure System. This includes configuring the IP address, NTP server, email relay, and other values.
This is only valid if you have enabled DHCP on the network where your OP5 Monitor system resides. If not, you need to set up your network from the console.
Note: The graphical Configure System interface has been deprecated. It is only available on installations running Red Hat Enterprise 6. If you are running EL7 or later, configure your system using the steps in Additional server and software setup.
Get started with the portal
Before you can configure OP5 Monitor, you need to log on using the password for the root account. Initial login information is:
password: monitor
Portal login troubleshooting
Sometimes the portal login can fail. In this section we will show you some troubleshooting tips.
The Configure System feature in the portal requires the user to log in using the root password. If this login appears to stop working, follow the steps below to troubleshoot this problem:
- Is the config daemon running?
- Is your system set up with a locale other than C, or not an English locale? Running the following from the shell:
- Is the socket configured with the correct permissions?
- Is the Apache user able to talk to the socket?
- Check that the
op5configauthentication module accepts therootpassword: - The
op5configauthentication module, which runs asroot, drops to the Apache user and tries tosutorootusing the supplied password. Is this procedure working?
# ps -eo user,cmd | grep op5config
root /usr/bin/php -q /opt/op5sys/bin/config-daemon.php -p /var/run/op5config.pid -d
# xargs -0n1 < "/proc/$(</var/run/op5config.pid)/environ" | grep -e ^LANG= -e ^LC_
A correct output is similar to the following:
LANG=CLANG=en_US.UTF-8
Note that running the locale command also returns a value. However, that value may differ from the environment of the op5config process, if the values changed after bootup. In this case, the running process can inherit the environment set in /etc/sysconfig/i18n.
LANG values other than English, such as de_DE.utf8 or sv_SE.utf8 need to be changed. One solution is to make sure LANG is set to C in /etc/sysconfig/i18n and reboot the server. Red Hat provides full details on setting the value successfully.
# ls -l /tmp/op5daemon
srw-rw---- 1 root apache 0 Feb  7 15:00 /tmp/op5daemon
# echo a | sudo -u apache unixcat /tmp/op5daemon
127|Unknown command.
(Ctrl+C)
# read -r -p 'Enter root password (no echo): ' -s password; echo
# password="$(printf '%s' "$password" | base64 | tr -d '\n')"
# printf 'read login/password verify root "%s"\n' "$password" | unixcat /tmp/op5daemon
0|OK
(Ctrl+C)
These commands can help in cases where the wrong password is entered or the password fails for some other reason:
# read -r -p 'Enter root password (no echo): ' -s password; echo
# password="$(printf '%s' "$password" | base64 | tr -d '\n')"
# printf 'read login/password verify root "%s"\n' "$password" | unixcat /tmp/op5daemon
1|read failed.
Invalid user or password
(Hit 'ctrl+c'. This fail response is delayed a few seconds.)
# sudo -u apache su - -c id
Password: (Enter root password, as supplied in the Portal)
uid=0(root) gid=0(root) groups=0(root)
Some users have previously changed the system's PAM configuration, which prohibits this user change from Apache to root. To check the PAM configuration, you can verify the files located in etc/pam.d/:
# rpm -qf /etc/pam.d/* | sort -n | uniq | xargs rpm -Vv | fgrep ' /etc/pam.d' | egrep -v '^\.{9} ' | sort -k3
....L.... c /etc/pam.d/fingerprint-auth
....L.... c /etc/pam.d/password-auth
....L.... c /etc/pam.d/smartcard-auth
....L.... c /etc/pam.d/system-authpackage
/etc/pam.d/totally-new-file-not-belonging-to-any-rpm-package is not installed
The output will only include PAM authentication files with anomalies. If a file in the directory does not belong to any installed RPM package, a line similar to the last line above is displayed. The verification codes, found in man 8 rpm, show that the valid auth files above each have a symlink that fails to resolve. This is actually normal:
| S | File size differs |
| M | Mode differs (includes permissions and file type). |
| 5 | Digest (formerly MD5 sum) differs. |
| D | Device major-minor number mismatch. |
| L | readLink(2) path mismatch. |
| U | User ownership differs. |
| G | Group ownership differs. |
| T | mTime differs. |
| P | Capabilities differ. |
Settings
The following settings can be configured step by step. To pass from one object to the next, you can click Apply & continue to save the new settings, or Skip & continue to leave them with the old value and continue. You can also save the new value and stay in the same section, by clicking Apply.
Time settings
You can configure NTP (Network Time Protocol), time zone, and hardware clock settings.
To add a new time server, type in the new server name in the NTP server text field and click Add. You can also remove one by clicking Remove.
Email settings
You can figure the hostname, relay host, fallback relay, and email address for the email server on your OP5 Monitor system.
If you do not configure a relay host or fallback relay, the OP5 Monitor system acts as a regular MTA and send the emails to whichever mail server is responsible for the receiving mail domain.
Besides adding a relay host and fallback relay host, you can also send a test message. To send a test message, enter the receiving email address in the Email Address field and click Send test message.
SMS modem settings
To configure settings for an SMS modem:
- Select Add new device. This will add a new SMS gateway to your setup.
- Click edit to configure the SMS gateway.
- Edit the settings for the SMS gateway:
- Enter a PIN code, if any.
- Select the correct modem type from the drop-down list.
- Click save.
OP5 Monitor includes two types of modems. If you are using another modem, select the other option.
To add another SMS gateway, repeat the same steps.
Network settings
You can set up a static address on your interfaces or turn on DHCP instead. You can also add a bonding interface and decide which interfaces to bond. The bonding configuration uses mode-1 (active-backup) which is the supported way to bond interfaces. More information about bonding and modes can be found on the CentOS Bonding wiki.
By default, the OP5 Appliance System uses DHCP on all network interfaces. This is also the case for the DNS settings.
To change the host name:
- Click Static in the DNS settings.
- Change the hostname in the Host name text field.
- Click Apply and then Apply again at the bottom of the page.
To change the DNS settings:
- Click Static or DHCP.
- Enter the IP address of your primary, secondary, and tertiary DNS servers. The last two are optional.
- Click Apply.
To configure a static address on an interface:
- Click Static on the interface.
- Enter the IP Address, Netmask, and Gateway.
- Click Apply and then Apply again at the bottom of the page.
To set up DHCP on an interface:
- Click DHCP on the interface.
- Click Apply and then Apply again at the bottom of the page.
To set up a bonding interface:
Setting up a bonding interface is divided into two steps:
- Adding the new interface.
- Assigning physical interfaces to the newly created bonding interface.
- Click Create a new bond interface.
- Click either Static or DHCP.
- Enter the IP Address, Netmask, and Gateway
- Click Apply.
- Click Bond on the interfaces you want to assign to this bonding interface.
- Choose the bonding interface and click Apply. Repeat this for every interface you want to add.
- Click Apply at the bottom of the page.
IPv6 is not supported by OP5 Appliance System.
Backup
You can configure automatic backup of your OP5 Monitor system. You can also set a local storage path to a mount point for a mounted external file system, a shared folder on a remote server.
You can choose between three types of storage:
- local
- ftp
- sftp
op5-backup does not back up op5-logserver logs, so you need to configure remote archiving for them or back them up manually.
To configure backup, enter a storage path, as follows:
- If storage type is Local, enter a local path.
- If you are using FTP or SFTP, enter the path on the remote server.
System maintenance
Update system
If your server has internet access, you can use this as a front end to the command line tool yum.
Enable nightly updates if you want the updates to be installed automatically as soon as they are released.
If you have any packages listed in Available updates, select the package you want to install and click Install. During the update process, you cannot start another update.
Updates bar
If updates are available to OP5 Monitor or OP5 Appliance System, a bar notifies the user about this.
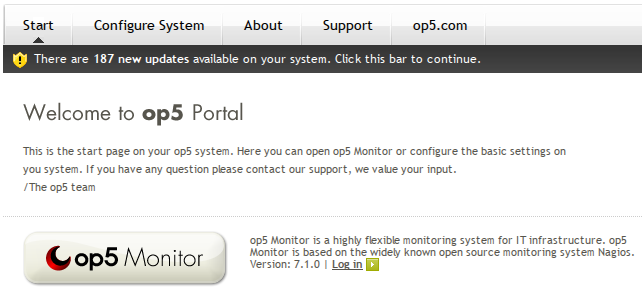
The update check is scheduled to run once per hour.
Backup now
You can make manual OP5 Appliance System backups.
There are two types of backups:
- default
- change arch
The default backup type backs up the same things that are backed up with the automated backup.
The change arch backup excludes architecture-specific elements such as binaries, which means you can use it to change your OP5 Appliance System from a 32 bit to a 64 bit system.
To perform a manual backup:
- Click Backup now.
- Choose which type of backup you want to perform.
- Choose what to include in the backup.
Module Description docuwiki The wiki part of OP5 Monitor nagios-plugins All custom plugins added to OP5 Monitor. op5-geomap OP5 Monitor Geomap op5-notify The notify folder, including custom notify skins op5-synergy OP5 Monitor Business Services module op5-system Backup of the OP5 configurations files ssh SSH keys, including keys for distributed/redundant systems sysconfig The systems configuration, including network settings, mounts, etc. Use this only for disaster recovery op5-logserver backs up the OP5 logserver settings - Give the backup file a name and click Backup.
When your backup is finished, you need to save your backup file.
The backup file is a normal tar file, but it has .backup as an extension instead. It can be used with the op5-restore utilities.
The file is saved in location /var/www/html/backups/ on your OP5 Appliance System. You can download it over SCP.
To save the newly created backup file:
- Click Download.
- Choose the location where you want to save it.
Restore backup
To restore a backup:
- Select the backup file from the drop-down list.
- Click Restore.
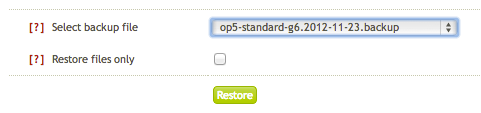
Backups must be in the local backup directory /var/www/html/backups.
Services
You can stop, start, or restart a service on your OP5 Appliance System using the user interface.
To stop, start or restart a service:
- Click Services.
- Click stop, restart or start on the same line as the service name of the service. Note that not all services are listed.
Licence management
You can add your OP5 Monitor licence through the user interface. You need to ensure that your licence corresponds to your usage. By adding your licence file, you also gain access to updates using the yum update command.
To add a license file:
- Click License Information in the main menu.
- Click Browse and choose the license file.
- Click Upload.
- Click Install.
If you do not have a licence, there is also an option to purchase one.