If you are currently using version 5.x.x, we advise you to upgrade to the latest version before the EOL date. You can find the latest documentation here.
Kubernetes Monitoring User Guide
The end of life (EOL) date for this integration is 30 September 2020. This documentation is now archived and is no longer updated. The Collection Agent plugin for Kubernetes now replaces this integration, see Installation in a Kubernetes or OpenShift environment.
Overview
Kubernetes is an extensible open-source platform for managing containerized workloads and services. It provides a container-centric management environment.
This integration provides a Gateway configuration file that enables monitoring of Kubernetes environment through a set of pre-configured Toolkit samplers.
You can query the services of your Kubernetes running environment, see the number of pods, you have the ability to describe builds and tail logs from a pod or from a container.
This guide walks you through the integration process.
Intended audience
This user guide is intended for experienced Geneos users who want to set up and configure an integration between Geneos and Kubernetes.
As a user, you should be familiar with Python and with general administration of the Kubernetes services.
Prerequisites
The following requirements must be met on the machine where the Netprobe is installed:
- Geneos version 4.11.x or higher.
- Python 3.4 or higher.
- The
kubectlclient binary, version 1.1 or higher. It can be downloaded from the Kubernetes website.- When you set it up, you will have a configuration files that you can use to access the Kubernetes environment.
- Access to the Kubernetes environment version 1.1 or higher.
Note: The support and compatibility that ITRS provides are only limited to the currently supported versions of Kubernetes. In addition, not all resources covered in our samplers might be available in your Kubernetes environment.
Setup and configuration
The Kubernetes monitoring integration is largely pre-configured and involves these primary steps:
- Download the integration files from the resources site.
- Load the integration file in the Gateway Setup Editor.
- Associate the samplers with a managed entity.
- Configure the dataviews.
Note: The include files are intended to be read-only and should not be edited (unless the integration specifically requires for them to be modified). This is because include files can be shared between a few instances of a Gateway and best practice is to share them in their default state. It is also to make the upgrades and maintenance process of the integration files easier. All configuration should be carried out in your local Gateway files instead.
Download the integration files
- Download the integration package
geneos-integration-kubernetes-<version>.zipfrom the ITRS Downloads site. - As a best practice, save the files on the same machine where your Gateway is running.
The integration package includes the include/kubernetesMonitoring.xmlfile. This is a Gateway configuration file (also called an include file) containing Toolkit samplers configured for Kubernetes monitoring integration.
Load the integration files
To load the integration files into the Gateway Setup Editor, follow these steps:
- Open Gateway Setup Editor.
- In the Navigation panel, click Includes to create a new file.
- Enter the location of the file to include in the Location field. In this example, it is the
include/kubernetesMonitoring.xml. - Update the Priority field. This can be any value except
1. If you input a priority of1, the Gateway Setup Editor will return an error. - Expand the file location in the Include section.
- Select Click to load.
- Click Yes to load the new include file.
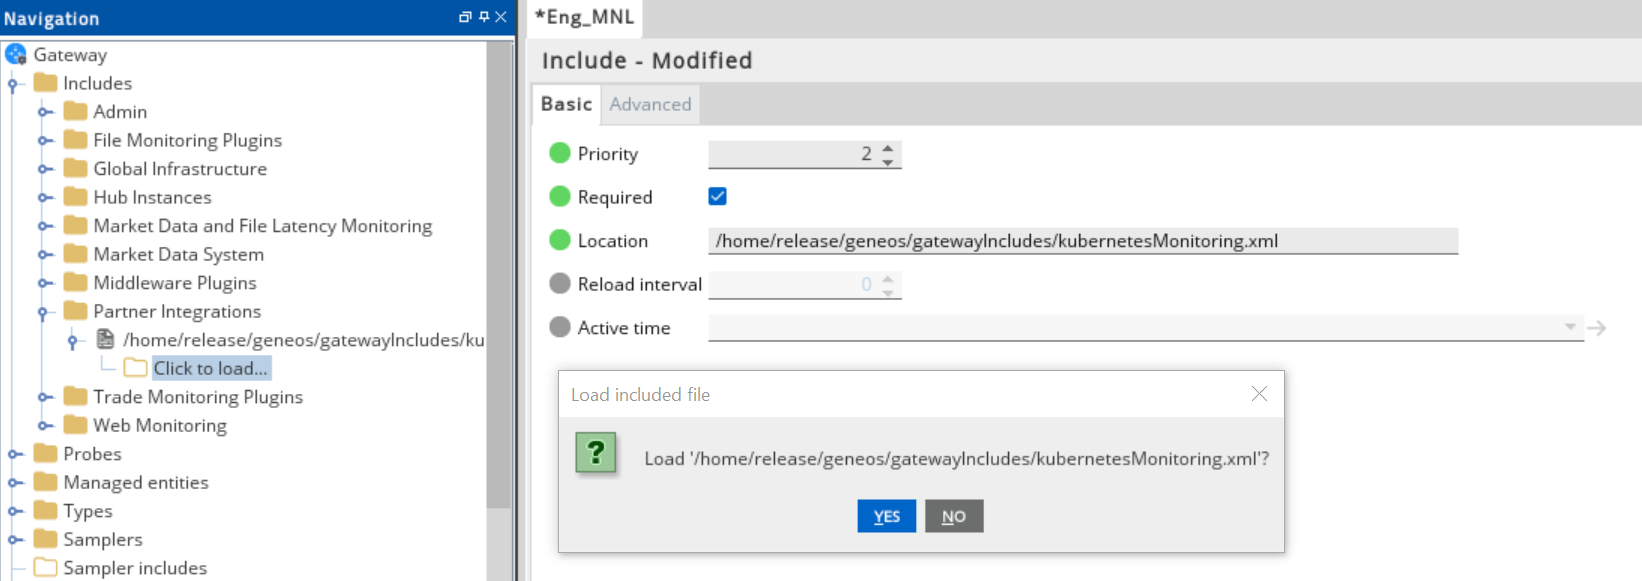
Success: Gateway configuration now appears in the Includes section.
For more information on the dataviews associated with the Kubernetes monitoring integration, see the Kubernetes Monitoring Technical Reference.
Associate the samplers with a managed entity
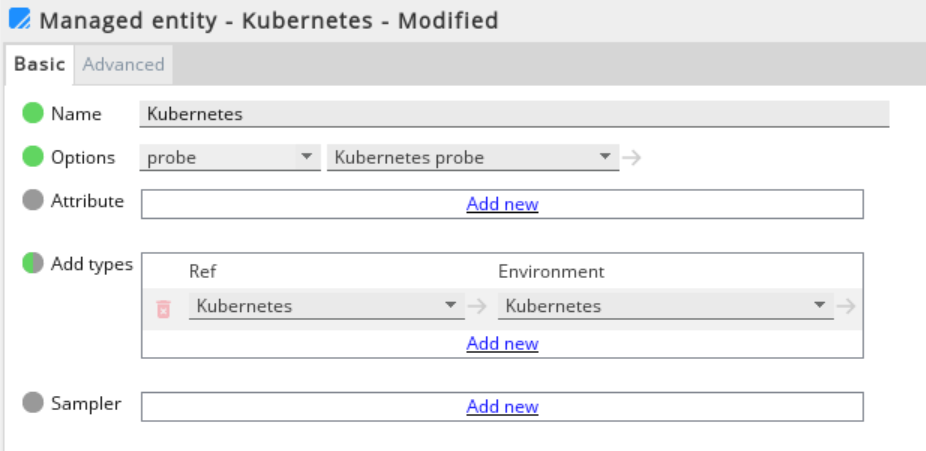
After you have loaded the configuration file, the Kubernetes samplers become available for use. These samplers are associated with a pre-defined Type. To associate the samplers with a managed entity, follow these steps:
- In the Gateway Setup Editor, create a new managed entity by right-clicking the Managed entities folder.
- Under the Basic tab for the new managed entity, add a pre-configured
Kubernetestype. - Specify the environment associated with the samplers. By default, this is
Kubernetes. - Apply the managed entity to the running Netprobe.
- Click Validate current document
 to check your configuration.
 - Click Save current document
 to apply the changes.
Success: After you save your changes to the managed entity, the Kubernetes dataviews appear under the managed entity on the state tree.
For more information about include files, see the 'Include' files in Gateway Setup Editor.
Configure the samplers
This integration provides a number samplers, each with a default dataview. You can customize some of them to show details of specific pods, nodes or containers. Samplers that can be customized are:
- PodHealth
- PodContainers
- NodeHealth
To configure a sampler with a particular pod, node or container, use the environment variables. The value of the variable is a name or uid of what you want to see the details of. For more information, see Environment variables in Kubernetes Monitoring Technical Reference.
Below you can see an example configuration of a specific PodHealth sampler.

Commands
When viewing the metrics you can also communicate with the Kubernetes environment by streaming the logs out of that environment. This is achieved by using the preconfigured commands.
The following commands are available:
- For pods:
- Describe pod — displays metadata and build information for this pod.
- Get pods log — used if there is only one container. If there are more, an error is displayed.
- Get pods containers log — used if there is more than one container. You must specify a container name to get the logs for that container.
- For nodes:
- Describe node — displays metadata of the selected event.
- For events:
- Describe event — displays metadata of the selected event.
For more information about using and configuring commands, see Gateway Commands.
Environment configuration
The default environment configuration is created by the kubernetesMonitoring.xml script. You can create a new environment based on the default and modify the environment variables according to your system.
Note: Standard variable scoping rules apply when variable reference is used in include files. Please take note of that when creating your own variables. For more information, see Variable Scoping and Resolution in User Variables and Environments.
For more information on the environment variables used in this integration, see the Environment variables in Kubernetes Monitoring Technical Reference.
Further reading
After you have included the monitoring samplers, you can learn about its dataviews and environment configuration in the Kubernetes Monitoring Technical Reference.