Install and set up Data Collector
Overview Copied
This page outlines the procedures to download and set up Data Collector including the information on how to connect to Capacity Planner.
Note that when extracting data from cloud providers, Capacity Planner the data collectors are run from the environment using secure read-only credentials provided by the customer. This avoids unnecessary network transfer, the need to upgrade and maintain on-premise data collectors, and ensures that data collection is always at the most up-to-date release.
Prerequisites Copied
Minimum VM requirements Copied
The collector uses the Windows task scheduler to allow you to configure frequent data updates and ensure your model and capacity predictions are up to date. Although you can run this on your own machine, it is recommended that you use a dedicated VM with the following minimum configuration:
- 2 × 2 GHz vCPU
- 4 GB RAM
- Windows 7
- 40 GB of hard drive space
- .NET framework 4.6.2
- A scheduled task user with permissions to run scheduled tasks
API login Copied
In order to upload collected data, the Data Collector must log in to the Capacity Planner REST API with an API login. ITRS will supply you with the login on request.
Note that API login can only be used with one Data Collector instance. If it is used with more than one, then all the other Data Collector instances will be logged off. If you need to run more than one , ask to provide an API login for each .
Create a Windows user for scheduled tasks Copied
The Windows Task Setup section of the collection task editor requires the username and password of the Windows user that can be used by the scheduled task.
This user should be a member of the Administrators group on the local machine, and have sufficient permissions to allow a scheduled task to be run, even when the user is logged out. The local policy must allow network passwords to be saved.
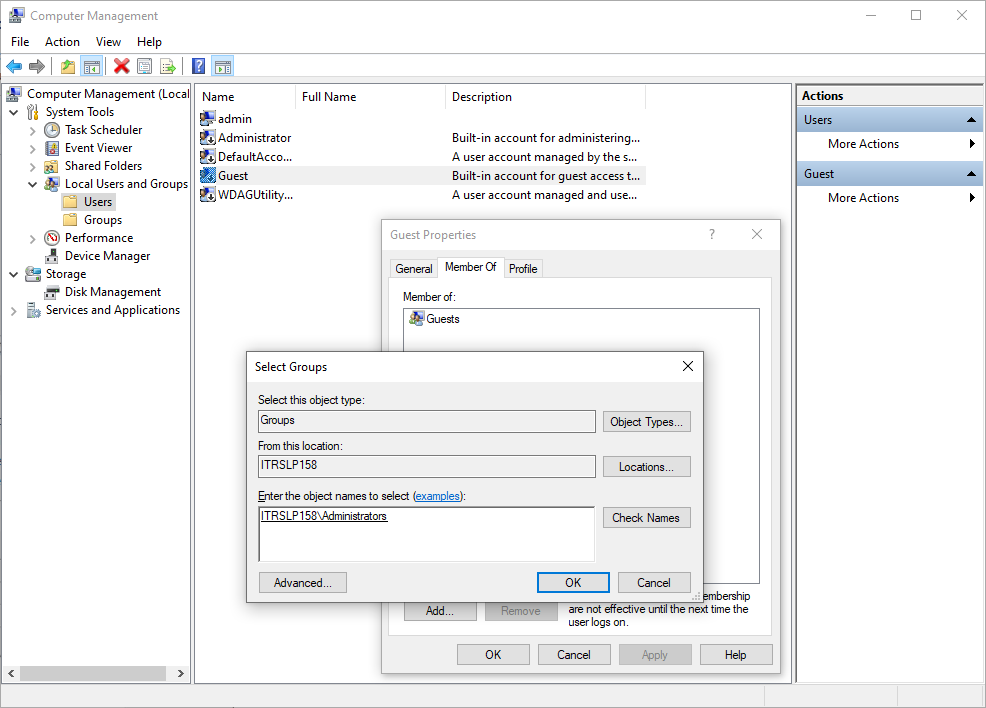
Add the user to the Administrators group Copied
- Open Computer Management on the Windows machine.
- Under System Tools, select Local Users and Groups and open the Users folder.
- Double-click the user you are using to run scheduled tasks to open the properties window.
- Open the Member Of tab and click Add. This opens the Select Groups window.
- Enter Administrators as the object name and click Check names to add it.
- Click OK and close other windows.
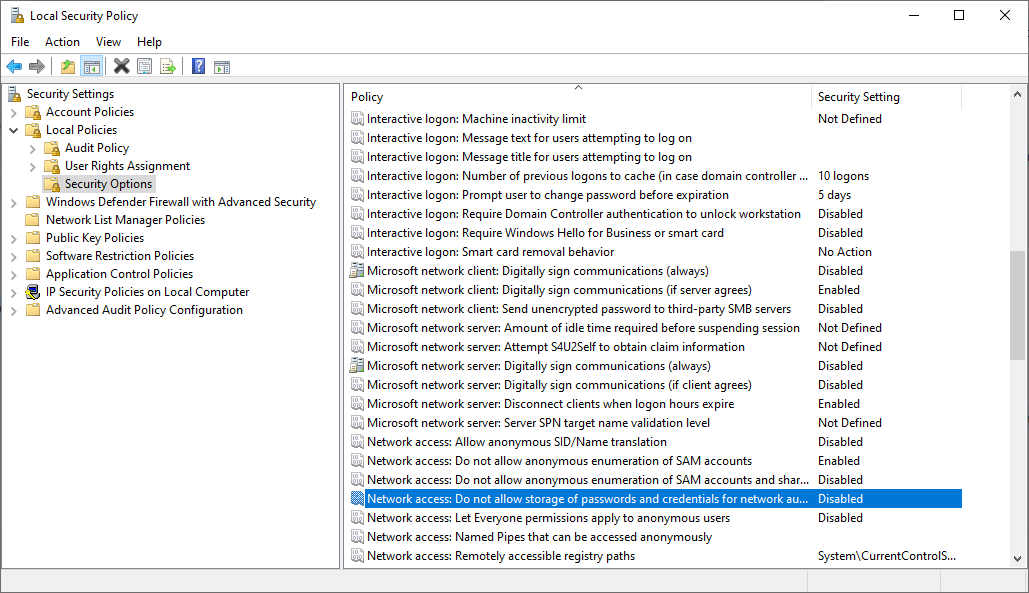
Set network password policy for scheduled task Copied
If you are using a network rather than a local user for the scheduled task to run collections, Windows must allow its credentials to be stored in the local credential manager.
Check with your administrator that they are happy for the following change to take place.
-
Open the local security policy window from the Windows start menu by typing:
secpol.msc -
From the Security Settings menu, select Local Policies > Security Options.
-
Find the policy called Network access: Do not allow storage of passwords and credentials for network authentication.
If the policy is enabled, double-click it and change it to Disabled and click OK.
Set up or verify permissions Copied
The user needs the following permissions:
- Log on as a batch job
- Log on as a service
- Folder access to execute from
...\Program Files\ITRS\Capacity Planner Data Collector
To set up or verify user permissions, follow these steps:
- Open the local security policy window from the Windows start menu by typing:
secpol.msc
- From the Security Settings menu, select Local Policies > User Rights Assignment.
- Double click the Log on as a batch job policy in the right-hand list.
- Click Add User or Group to open theSelect User, Computers, Service Accounts or Groups dialog box.
- Click the Locations button and select the local machine from the list.
- Enter the new user name as the object name and click Check Names to add it.
- Click OK and close other windows.
- Repeat the steps for the Log on as a service policy.
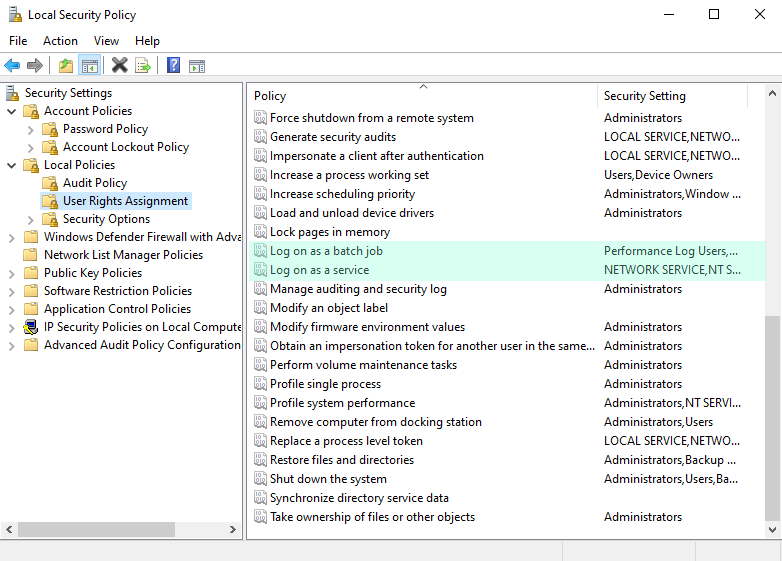
You can now use this user to create scheduled tasks in the Collection Manager.
If you are using AWS Collection tasks, make sure that AWS credentials have been set for the scheduled task user. See Select and add credentials in Collection tasks.
Ensuring connectivity and firewalls Copied
The Data Collector makes use of the Capacity Planner REST API at icp-api.itrsgroup.com. It is essential that *.itrsgroup.com is whitelisted within your firewall configuration on port 443.
To verify, open a browser on the VM that is hosting the Data Collector and check that icp-api.itrsgroup.com is reachable.
For more information on Capacity Planner API, see API documentation.
Download the Data Collector Copied
The most recent version of the Data Collector can be downloaded from ITRS Resources.
Install the Data Collector Copied
To install, run the .msi file and follow the on-screen prompts.
The default install directory for the Data Collector is: C:\Program Files\ITRS\Capacity Planner Data Collector
Connect to Capacity Planner Copied
Before sending data to Capacity Planner, the Data Collector must first connect and verify your account.
When you first open Data Collector, you will see a Not linked to ITRS message and a lock symbol at the bottom left of the window.
Click the lock symbol and enter your Capacity Planner user credentials.
When you are successfully connected, the message updates to say Securely linked to ITRS as <username>– X projects available. X is the number of projects that you can load data to.
Note
At this point, it is possible to configure the Data Collector to operate in offline mode. When this is enabled, the Data Collector gathers data and prepares it for transfer but does not upload data to Capacity Planner. This mode is used when the collector is running in a part of the environment that does not have a direct connection to the Capacity Planner API.
AWS prerequisites Copied
To collect data from AWS, Data Collector needs access to an AWS user with the following permissions:
- AmazonEC2ReadOnlyAccess,
- AWSCloudTrailReadOnlyAccess,
- CloudWatchReadOnlyAccess
- AWSSavingsPlansReadOnlyAccess
- CostExplorerReadAccess, a custom policy containing permissions for GetReservationUtilization, GetDimensionValues, GetCostAndUsage and GetTags.
For more information, see Set up IAM role based access.
vCenter prerequisites Copied
Prior to running a VMware collection task in the Data Collector, a read-only account for vCenter must be available. This account is used to extract data from vCenter using the provided API.
Performance rollup jobs must be enabled. To ensure best possible results, we recommend a minimum of 5-minute average granularity of data stored for 24 hours. For more information on ensuring rollup jobs are configured, see vCenter article.
Geneos prerequisites Copied
Install ODBC drivers Copied
If the Geneos system you are collecting from uses an ODBC database, then you need to install the relevant ODBC drivers before you can create a collection task:
- On Windows, open the ODBC Data Sources Administrator application. If it is missing, then download and install it from the Microsoft website.
- In the ODBC Data Sources Administrator, click Add to open the Create new data source dialog.
- Select MySQL ODBC 8.0 ANSI Driver from the list and click Finish. ODBC data source configuration dialog opens.
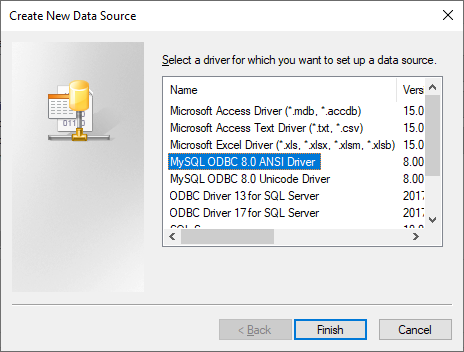
- Add a suitable name to identify the connection. For example,
geneos-data-collector. Take note of this name, as you will use it when setting up the collection task. - Enter the name of the server hosting the database as TCP/IP server, the username and password connections to the server, and select the database to connect from.
- Click Test to check the connection.
- Click OK to close the configuration dialog and then OK to close the ODBC Data Source Administrator application.
Set up the Geneos Capacity Planner Helper Copied
The recommended way of extracting data from Geneos and Gateway Hub is to use Capacity Planner Helper tables. These provide a clean interface between the system being queried and the Data Collector.
For more information, contact your ITRS account representative.
Log files Copied
After the Data Collector completes a collection, it uploads the log files to the API. No sensitive data is written to these files, and they are used purely for analysis.
Log files are currently not administered by the application and can use up disk space. It is recommended to routinely delete log files to free up disk space. Log files are written to a Logs folder, typically C:\Program Files\ITRS\Capacity Planner Data\Logs.