Remote Collector Management
Overview Copied
Remote Collector Management enables clusters of monitoring collectors in a multi-site deployment to be managed remotely and independent of the Master Monitoring Server. You can also delegate the responsibility of managing the cluster to an administrator local to the cluster.
Supported operating systems Copied
Please refer to the list of supported operating systems.
Required ports Copied
Please refer to the information in Using Remote Collectors.
Remotely Managed Collector installation and registration Copied
Permissions Copied
Two Roles are involved in the setup of Remotely Managed Collectors.
- The first Role creates the cluster and requires the
CONFIGUREREMOTECLUSTERpermission. - The second Role installs, registers, and updates Remotely Managed Collectors within the cluster. This role requires a number of permissions, including the
REMOTELYMANAGEDCLUSTERSpermission. A template role has been created with this set of permissions. This role can be cloned and modified to meet specific needs. For example, the role can be given permission to manage collectors within a specific cluster.
Note
The second Role does not include theCONFIGUREREMOTECLUSTERpermission intentionally.
Create the cluster Copied
This requires the CONFIGUREREMOTECLUSTER permission.
Note
You can skip this step if the remote administrator has theCONFIGUREREMOTECLUSTERpermission.
-
Navigate to Configuration > Collector Management.
-
Click the + button to add a new Remotely Managed Cluster.
Enable access to the new cluster Copied
The remote administrator Role can be given permission to access the new cluster.
-
Navigate to Configuration > Users and Roles > Roles.
-
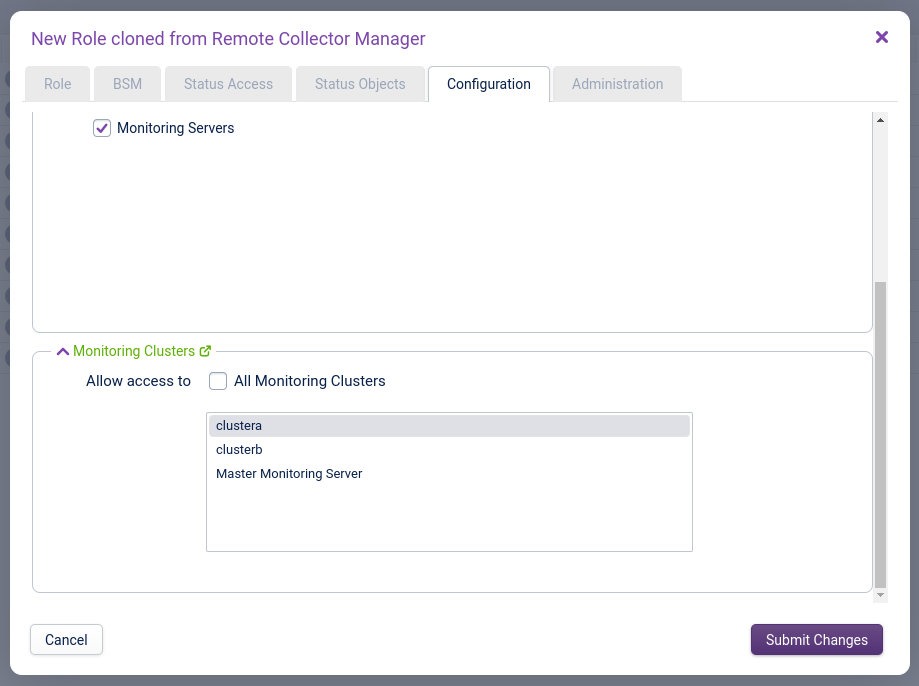
Clone the existing Remote Collector Manager role and edit the new role.

-
On the Configuration tab, ensure the new cluster is selected under Monitoring Clusters.
-
On the Administration tab, ensure the new cluster is selected under Remotely Managed Clusters.
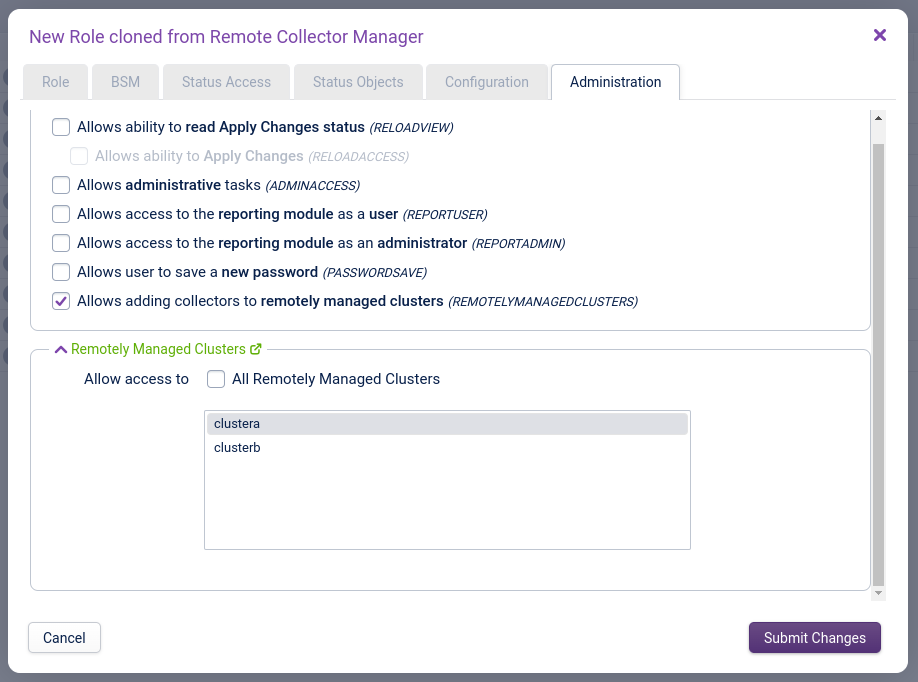
-
Submit changes and apply your changes by clicking Configuration > Apply Changes.
Install and register the first collector Copied
Collector prerequisites Copied
Before a collector is registered, ensure that the command hostname -f displays the fully qualified domain name (FQDN) of the collector.
The FQDN must also be the first name that appears in the /etc/hosts file on the collector.
For example:
127.0.0.1 collector123.example.com collector123
127.0.0.1 localhost
::1 localhost
Additionally, the hostname of the system (output of the command hostname with no arguments) should meet these requirements:
- A short name with no DNS domain included, rather than the FQDN of the system.
- Only lowercase letters (a-z), numbers (0-9), and hyphens (-) are allowed characters.
Use hostnamectl to set the hostname and ensure it matches the entries in /etc/hosts or your DNS (or other name resolving system).
For RHEL 7/8/9 systems, ensure the subscription manager is configured to allow system repositories. Verify that the disable_system_repos option is set to 0 in the /etc/dnf/plugins/subscription-manager.conf file on each system.
Additionally, the root user must be able to run sudo without a password.
Registration Copied
Installation and registration of the new collector are performed on the command line of the collector itself.
-
To commence the installation, run:
curl -sSLo - https://ORCHESTRATOR/downloads/deploy-collector | sudo bash -s -- --username USERNAME --orchestrator ORCHESTRATOR --cluster "CLUSTER"ORCHESTRATOR— replace this with the address of the Master Monitoring Server.--username— name of the remote administrator.--orchestrator— address of the Master Monitoring Server.--cluster— the cluster name. It should match the name of the cluster added in the previous section. This must be enclosed in quotes. If the cluster does not exist and the remote administrator has theCONFIGUREREMOTECLUSTERpermission, then the cluster will be created as part of the installation and registration process.--insecure— do not perform server certificate checks when connecting to the ORCHESTRATOR, see below for reference.--ssh-tunnel— configure an SSH tunnel from the collector to the Master Monitoring Server, see below for reference.Note
If you have rehomed your application, update the URL appropriately.
To learn about all the options available, you can use the help option:
curl -sSLo - https://ORCHESTRATOR/downloads/deploy-collector | sudo bash -s -- --help -
Enter the password for the remote administrator when prompted.
-
If certificate checking is to be disabled, add
-kand--insecureto the command line:curl -k -sSLo - https://ORCHESTRATOR/downloads/deploy-collector | sudo bash -s -- --username USERNAME --orchestrator ORCHESTRATOR --cluster "CLUSTER" --insecureThe installation and registration should take a few minutes.
If succesful the following message will be displayed on the collector:
Installation complete. Contact your administrator on ORCHESTRATOR and ask them to Apply Changes. -
After the installation has run successfully, the registration can be completed by applying the changes in Configuration > Apply Changes.
Add more collectors to the remotely managed cluster Copied
To add additional collectors to the cluster, wait until the first collector has fully registered. Then, log on to the collector to be added and enter the same command that was used to register the first collector. Do not register any further collectors in the same cluster until the first new collector has fully registered.
If you register additional Collectors without running Apply Changes, some checks may fail with a CRITICAL "no such file or directory" error.
Problems with installation Copied
If you encounter any problems during the installation, you can safely run the command again.
SSH Tunnels Copied
Remotely managed collectors can be configured to route all connections to the Master Monitoring Server via SSH tunnels. This is especially useful when the Master or Collectors are behind restrictive firewalls.
If an SSH tunnel is required from the collector to the orchestrator, then the --ssh-tunnel option should be used when running the registration command:
curl -sSLo - https://ORCHESTRATOR/downloads/deploy-collector | sudo bash -s -- --username USERNAME --orchestrator ORCHESTRATOR --cluster "CLUSTER" --ssh-tunnel
Note
All collectors in the same cluster must be configured with the same option (either all use SSH tunnels or none of them).
Upgrading Remotely Managed Collectors Copied
Warning
It is recommended to upgrade remotely managed collectors soon after the Opsview orchestrator has been upgraded. ITRS Opsview does not support running remotely managed collectors on a version of Opsview that is older than the orchestrator for extended periods.
The user performing the upgrade must have the REMOTELYMANAGEDCLUSTERS permission for the cluster.
The upgrade can be executed in the following ways:
- Command line
- Opsview UI via the web
Note
There are certain instances where additional upgrade steps must be performed prior to the standard upgrade process:
- If you are upgrading any remotely managed clusters from version 6.9.0 or older to 6.9.1 or newer, refer to Upgrading from version 6.9.0 or older to 6.9.1 or newer.
- If you are upgrading remotely managed clusters with names containing the literal string
opsview clusteroropsview_cluster(case-insensitive) from versions between 6.9.2 and 6.9.6 to 6.9.7 or newer, refer to Upgrading from versions between 6.9.2 and 6.9.6 to 6.9.7 or newer.
Upgrading via the collector command line Copied
-
Run the command line below. This can be performed on any of the collectors in the remotely managed cluster.
sudo /opt/opsview/scheduler/bin/collectorupgrader --username USERNAME -
Enter the password when prompted.
-
If server certificate checking is to be disabled, add
--insecureflag to the command line:sudo /opt/opsview/scheduler/bin/collectorupgrader --username USERNAME --insecure
Upgrading via the web Copied
-
Navigate to Configuration > Collector Management.
-
Select the clusters to upgrade and then click Upgrade selected.

The Upgrade cluster screen displays the selected collectors to be upgraded, their current version, and their potential version after upgrading. This also indicates any collectors that cannot be upgraded, providing an explanation in a tooltip.

-
Click Upgrade to start the upgrade process for all listed upgradable collectors.
Note
If a new version is unavailable (when the listed current version and potential version are the same), upgrading a cluster will still run through the standard upgrade process and reapply configuration, but no Opsview packages will be updated.
Warning
If the upgrade fails due to a communication or timeout issue when contacting the collector, use the collector command line to upgrade instead.
Deleting Remotely Managed Clusters and Collectors Copied
To delete a cluster or collector, you must have the REMOTELYMANAGEDCLUSTERS permission.
Deleting the entire cluster via the web Copied
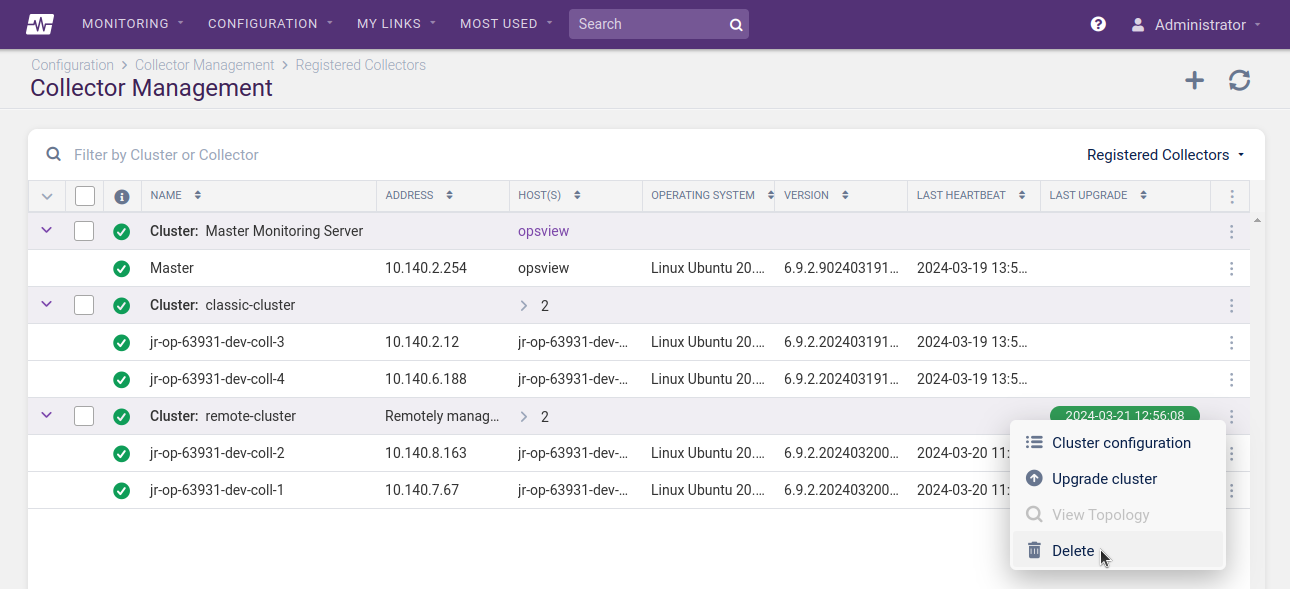
- Navigate to Configuration > Collector Management.
- Open the context menu for the cluster to be deleted and click Delete.
- Apply Changes.
Deleting the entire cluster using the collector command line Copied
Ensure that there are no Hosts currently being monitored by the Cluster.
This command can be performed on any of the collectors in the remotely managed cluster:
sudo /opt/opsview/scheduler/bin/collectordeleter --username USERNAME
When prompted, enter your password to proceed.
If server certificate checking is to be disabled, add the --insecure option on the command line:
sudo /opt/opsview/scheduler/bin/collectordeleter --username USERNAME --insecure
Deleting individual collectors via the web Copied
- Navigate to Configuration > Collector Management.
- Open the context menu for the collector to be deleted and click Delete. The deletion process will start and a message will appear when it is complete.
- After collector deletion is complete, Apply Changes.
Deleting individual collectors using the collector command line Copied
This command can be performed on any of the collectors in the remotely managed cluster:
sudo /opt/opsview/scheduler/bin/collectordeleter --username USERNAME COLLECTOR [COLLECTOR...]
When prompted, enter your password to proceed.
If server certificate checking is to be disabled, add the --insecure option on the command line:
sudo /opt/opsview/scheduler/bin/collectordeleter --username USERNAME COLLECTOR [COLLECTOR...] --insecure
Managing monitoring scripts Copied
Monitoring scripts (plugins, notification scripts, and event handlers) are distributed to all Remotely Managed Clusters as part of the Apply Changes process.
Troubleshooting Copied
When running commands on the collector command line, a basic error report should be displayed on the screen. For security reasons, only minimal information should be shown to the remote user.
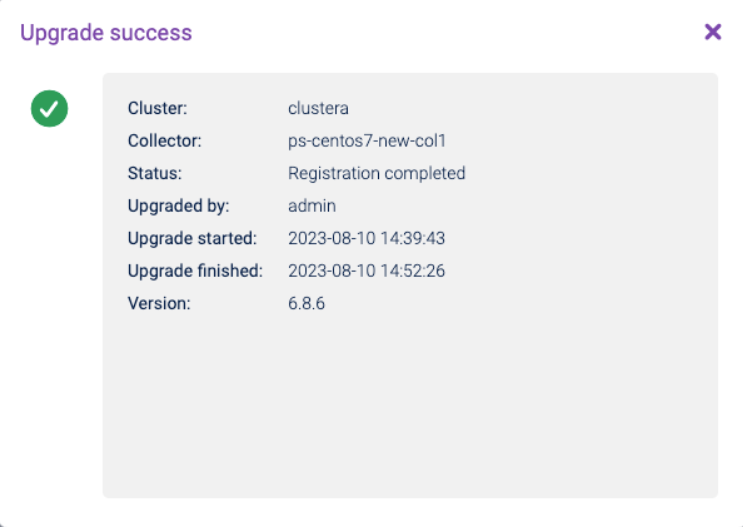
The Configuration > Collector Management web page will also show the status of registrations and upgrades.
Click the status pill in the Last Upgrade column to view additional registration or upgrade information.
Audit Log Copied
The Configuration > Audit Log web page also records remote collector management configuration activities.
Log files Copied
If you encounter any issues with Remote Collector Management, please view the system logs in the /var/log/opsview/opsview.log file on the Master Monitoring Server.
Additional upgrade steps Copied
Any relevant additional upgrade steps only need to be executed once. After completing them for the first time, you can skip the instructions in that section for all future upgrades.
Upgrading from version 6.9.0 or older to 6.9.1 or newer Copied
Due to a repository key change, this upgrade must be triggered after adding the new repository key.
Run the following command as root on one collector per cluster to add the key:
/opt/opsview/deploy/bin/rc.ansible ansible 'opsview_collector:!opsview_orchestrator' -m shell -a 'printf "opsview_repository_key: | \n$(curl https://downloads.opsview.com/OPSVIEW-APT-KEY-2024.asc)\n" | sed "1 ! s/^/ /" | sudo tee -a /opt/opsview/deploy/etc/user_vars.yml'
If you do not have access to the internet, the actual key string can be added instead with the following:
/opt/opsview/deploy/bin/rc.ansible ansible 'opsview_collector:!opsview_orchestrator' -m shell -a 'printf "opsview_repository_key: | \n-----BEGIN PGP PUBLIC KEY BLOCK-----\n\nmQGNBGXCQIwBDACiD5D1qlC35JtUwPGcy+n7eJIX9aSdjG5hWadMjZryyUadLTMc\nsNdDB0jblxeu4CFAe7g3LNJTnNlF6NpWHVz0fZ8R0jW2rNjlaoVgUrtn8OTshz3t\nQ+9/TRSONt+D1xl3+O8p+XUg8jDr07+izxzWstD9M3j2KWuc3ts4DimRQkmdnv+Q\nyd1fEpq1Z1djgB4aSCe10LzMY8AIPRMsrMyhJWz287D1sEnAYP66zrLTHKeWmeRY\nQBKNzA3Fhgo4g95j/IJPaYATQV6/oqyrD/Gtu/8N3Brr1popE+1NVdcmbY7M7yox\nYB6NnWKGKH+4vR9k4sNgrPp9g+WI0e1ZV8dXE0fCK6EJNUO9ZIOqr3uHrAF6ESmh\ndnc672jT4QLnhvWVOHrUYo3XUPhGhZA33MUxdsrK14y1iOQfa1g7WzZ2zLSs251/\nLGlxUN5VHIejSNcbRsbJkOGhn+dTop8NZgBVaiY5my6cAgsSW3O0yS24vodKw3ln\nERH54Rnff53+odUAEQEAAbRMT3BzdmlldyByZXBvc2l0b3JpZXMgKGh0dHBzOi8v\nZG93bmxvYWRzLm9wc3ZpZXcuY29tKSA8c3VwcG9ydEBpdHJzZ3JvdXAuY29tPokB\n0QQTAQgAOxYhBM+iZ8I4zbrWrT12Kzeseua0tpoLBQJlwkCMAhsDBQsJCAcCAiIC\nBhUKCQgLAgQWAgMBAh4HAheAAAoJEDeseua0tpoLXGEL/0I8cBhqnoro1yQV3Rmx\nnwM5aOF5kP1Pla78suceG9eiM0sMohur+K4mVM+Rx5l+ZLI3c/YfXnNLDl9SRCCX\nNaKAB2w60EWxzh734iwsOzN4B4WuYlilAt6QZ8qQP951A8++Sg9zTCRNg3B50BdL\nFO5v4KHQS8hcZWp5bxulSLQpQXxQNrtE+1haD6jeAbkeUHQfglYAywnhPQvShTAs\nzPOj/SclbgjX/9MRIXrVzztOsrpq2nSfihDiTfGCCTB1n1YyyLV9ib64ePxFjLtv\nqNMYf9G0QOgM8wqgzfMa92vFowMiJBn20uWzRbbj8GYlhumsMGqxrFri9r1AuGXY\nZygsoNpsi1VvBClSi48Dei8ChC4kQFwVz3WqFUUlHkc3TtigZATu7wUQmEzkSPkB\nT8pNgpOgVwgUChIbcS2EY54k2uZUZOHVad3ffyePLLB/eHotne+OKG67ebrXhFl9\nXkhGt5qCeRSxjw2NtfkycOdMLFnhdR9l7gfnUYUmrxSgSLkBjQRlwkCMAQwAknuc\nj5TN0ZxTapwMsg4gCY1NeKqptPQWe8FnGhak+Pj1ubL5TJovXwTqw0z30c2nI1zN\nJFbI5azfwDCMjHwey+JyqC0pdHn0I2jD2aGEnneZnwHjGaC+pULIWFAJwozOz0u1\nmMBgm5XcHDDatOIL0Zb8XkQgZR6h1mOxaoGWSrw4mqrU9BFENsdSXt+EBML58m0U\nzCcgRnWDCRzzPrxkiL1i4kw/Zuk1834R3GoABM19jzWzRP8nu+fS+urcHimWjWT7\nJaWCSO+961VXF69wqnd+bL0bvAGbuOuv1cGkrppR9pG8X8Hf+tHH6Afv3m/tmBld\nheonNcPNrsvaApqP7bSCjqiz0swlyPLw58ykqHrQ8G0ekMnVkXhEVMuqsNO+gJnF\neyJ9ijhTp6Ylh/mIfevmHtlqHbA+Uwsl81Mnv/+SzzRjrU3U9rMnKTb8UE9/yQQR\nppN73/dOpnGi2oLoY4rYi4+Iju4M06If28Yd6U5/UMSasNCcd2SJaB5+RFJzABEB\nAAGJAbYEGAEIACAWIQTPomfCOM261q09dis3rHrmtLaaCwUCZcJAjAIbDAAKCRA3\nrHrmtLaaCwJuC/4vpxxUKaI7+6q7vkWALc8coZ65ytZ8cXeFIAQIkX0L97fJraq1\n9yMxu1FdfaceE7bDIEPWPgiciaV7t+qGeDgmrInBpmqp51r3YJxx8zWiO6Y7pvoG\n/nlFNl4ZXZAEu7PtrcFaUNMgqP+EPAz0S3j32RIlMAOFTetxNEr0BoowlrMy6kCd\nqMBaN6rJLGH3U8yeNFHttKN32AvfIak+PRM6kVmdh+VCRpJlrpbb1JmeDF22Z5RW\nqNVPvgV5meSHiK1y8YMMsQSXNf8h2vbDn4K2HMpWUTjtdlPnsComuFv/+Laykbb7\nhkPy2bPwZgDDpViHx1O7wRaQQhjaMD/Iaohh6ynpsEZe9asXUpXOA49McQBQxNGb\nEKguzPusnnjwtbXbfPKLQGqGm4x7wQkB0JbTUarL8Jw1wXlyaibOSOkaCXTqMiFx\nbO/9XIX0oWLiOQYj+vFr/TaTXA8HEdEswwTZrirYHK0zAYDcU3AcFKIqVjUWeMkr\nl+F2x62WJX7sDGE=\n=Yi2S\n-----END PGP PUBLIC KEY BLOCK-----\n" | sed "1 ! s/^/ /" | sudo tee -a /opt/opsview/deploy/etc/user_vars.yml'
Then perform the standard upgrade process. If this is not carried out, you may encounter any of the following errors:
The following signatures couldn't be verified because the public key is not availableThe GPG keys listed for the "Opsview" repository are already installed but they are not correct for this package
Upgrading from versions between 6.9.2 and 6.9.6 to 6.9.7 or newer Copied
Remotely managed clusters with a name containing the literal string opsview cluster or opsview_cluster (case-insensitive) require executing the following additional upgrade steps. Otherwise, the upgrade will fail, resulting in a timeout issue.
If your cluster name does not contain those strings, you can skip this section and proceed with the standard upgrade process.
Warning
Upgrade the orchestrator before performing the additional steps. This will prevent potential issues with clusters that have a higher repository version than the orchestrator.
Before running the standard upgrade process, you must perform the following steps to upgrade the repository and the scheduler. This ensures that the upgrade process is reported accurately to the Orchestrator.
-
On one of the remote collectors in the cluster, set up the following playbook. This playbook amends the Opsview repository to point to the appropriate release and updates the
opsview-schedulercomponent in each remote collector.cat <<EOF > update-remote-collector-scheduler.yml --- - name: Update Opsview Repository and Scheduler on Remote Collectors hosts: opsview_collector:!opsview_orchestrator gather_facts: yes become: yes tasks: - include_role: name=opsview_repository - name: Update package cache shell: yum makecache || apt update register: cache_updated - name: Update opsview-scheduler before collector upgrade package: name: opsview-scheduler state: latest when: cache_updated.changed EOF -
Run the playbook on that collector. You must replace 6.x.x of
opsview_repository_versionwith the correct patch version you want to upgrade to. This must be the same patch version as your orchestrator server.
/opt/opsview/deploy/bin/rc.ansible ansible-playbook -e 'opsview_repository_version=6.x.x' update-remote-collector-scheduler.yml
- Delete the playbook by running the command:
rm -f update-remote-collector-scheduler.yml
If the preceding steps are not executed before the standard upgrade process, the upgrade will be stuck in a buffering state on the web, which will result to a timeout after an hour, even if the upgrade playbooks have been completed on the collector.
Note
If you skipped the preceding steps, you must rerun the collector upgrade steps on Upgrading via the collector command line or Upgrading via the web for the upgrade to proceed successfully.