Opsview 6.8.x End of Support
With the release of Opsview 6.11.0 on February 2025, versions 6.8.x have reached their End of Support (EOS) status, according to our Support policy. This means that versions 6.8.x will no longer receive code fixes or security updates.
The documentation for version 6.8.9 and earlier versions will remain accessible for the time being, but it will no longer be updated or receive backports. We strongly recommend upgrading to the latest version of Opsview to ensure continued support and access to the latest features and security enhancements.
Creating an Autodiscovery scan
Creating a new scan Copied
Click Create New Scan which will present you with a list of scan types:
- Network Scan — this will scan based on a specified IP range then do Detection Mapping Scan.
- VMware Scan — this will interrogate a previously configured VMware host using VMware’s API SDK, and retrieve a list of IPs to then do Detection Mapping Scan. This requires a VMware Host to be configured in Opsview already.
- Windows Scan — this will scan a Windows Active Directory server to retrieve a list of IP addresses to do detection mapping and agent mapping.
The options between the first two are very similar, so we will describe the Network Scan. Below in the page, we will highlight the differences for VMware Scan and Windows Scan.
Configuring a Network Scan Copied
When you click on Network Scan, a modal window will appear, as per the screen shown below:
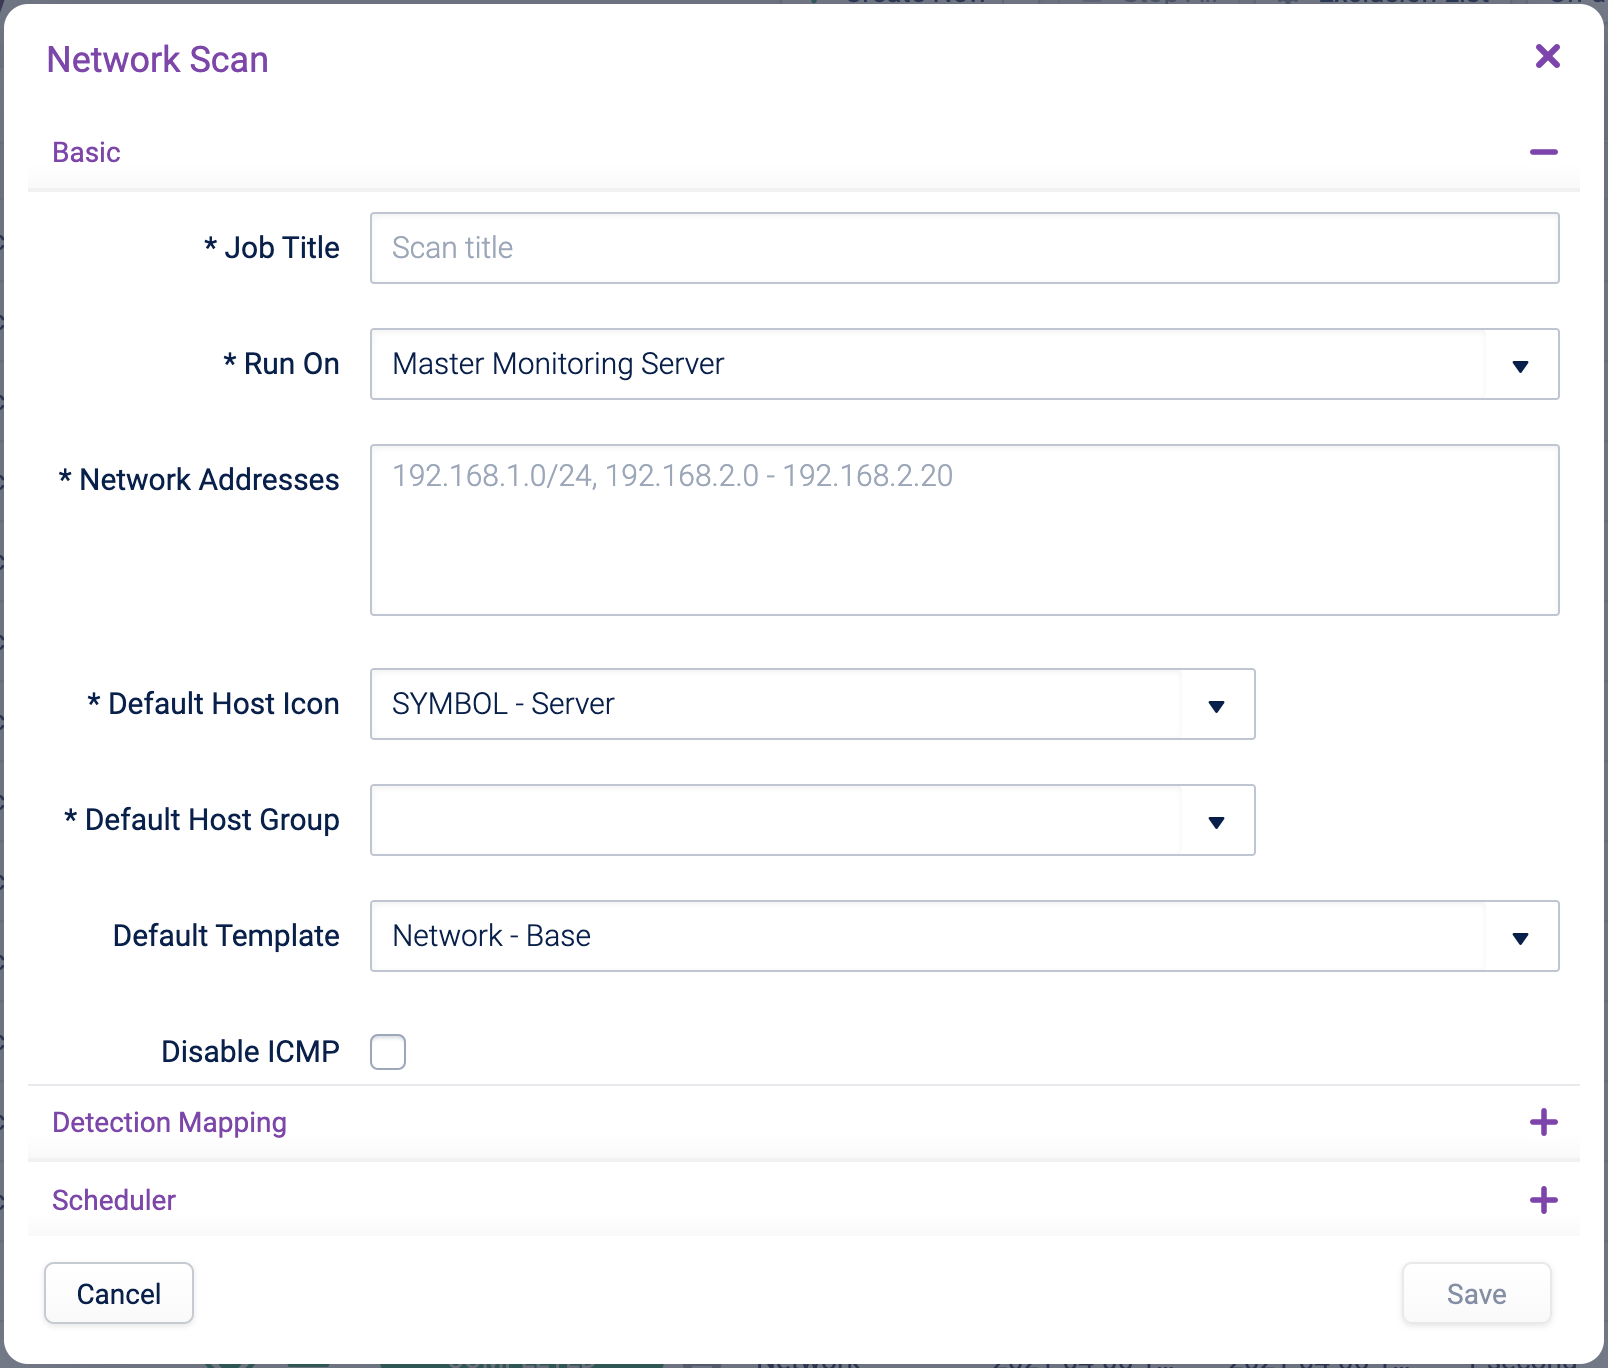
The modal window is split into three sections: Basic, Detection Mapping and Scheduler.
Basic interface Copied
The Basic section allows you to pre-define a set of options you are likely to use to start monitoring a discovered Host. You can fine-tune those options after a scan has been ran or at any point when the host is already being monitored:
- Job Title — a meaningful name for the scan.
- Run On — this is a drop-down of all available monitoring clusters within the Opsview Monitor system. This allows you to run an Autodiscovery scan from a remotely managed collector that may have access to different networks. The selected cluster must already be monitoring at least one host or the scan will fail.
- Network Addresses — enter the network addresses that are to be scanned. Ranges can be added in either CIDR notation (i.e. /24) or via a range (192.168.2.0 - 192.168.2.20). Note: There is a maximum of 100,000 IP’s that can be scanned in a single Autodiscovery scan.
- Default Host Icon — the Host icon to apply to all discovered Hosts (can be amended later). By default, this is set to ‘SYMBOL ’ Server’
- Default Host Group — the initial Host Group used for all discovered Hosts (can be amended later)
- Default Template — the Host templates to apply to all discovered Hosts (can be amended later). By default, this is set to ‘Network ’ Base’
- Disable ICMP — if unticked, then each IP must respond to an ICMP ping before detection mapping is run. If ticked, then all IPs in the range are assumed to exist and Opsview will do the detection mapping - at least one detection mapping must be configured. Note, disabling ICMP may make the scan take longer and all IPs will be reverse name resolved. This option is useful in secure environments where ICMP is blocked at the network level. Any IPs without any agents, SNMP or ports enabled will be removed from the discovered list.
- Primary Address Based On (IP Address/DNS Name) — within the scan results, if the primary address is based on IP, then the IP will be used as the ‘Primary Hostname/IP’. Otherwise, the ‘Primary Hostname/IP’ will be the DNS name
- Strip Base Domains for Host Title — if ‘DNS name’ is used in ‘Primary Address Based On’, then the list of base domains entered will be removed from any DNS name found. For example, this will convert ‘cisco2611.opsview.com’ to ‘cisco2611’ if we enter ‘opsview.com’ here.
Detection Mapping Copied
Detection Mapping is a phase when Autodiscovery will try to identify what is running on an IP address. The IP must respond to a ping (ICMP) before the detection mapping is run.
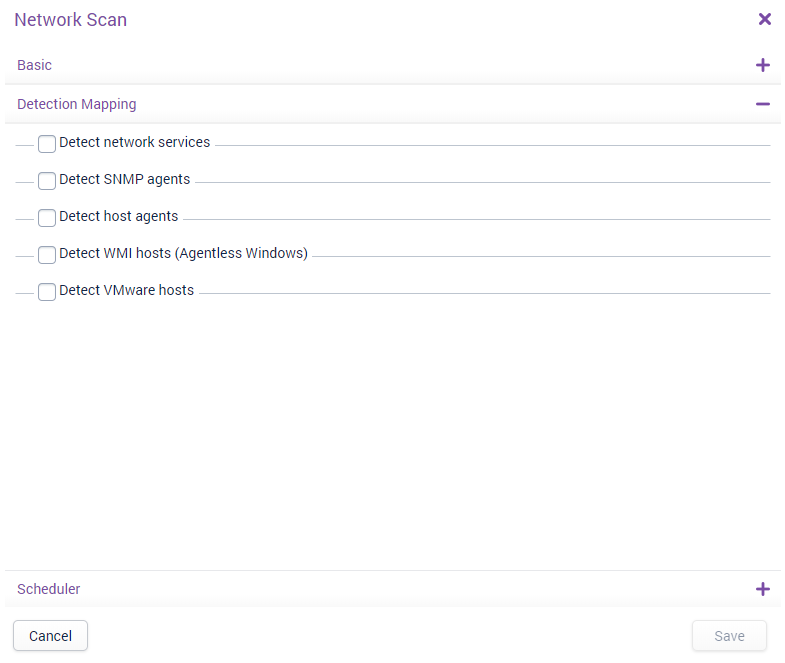
In the Detection Mapping section, the following are available:
-
Detect network services — if this option is checked, then the following services will be automatically detected: FTP (TCP port 21), SSH (TCP port 22), SMTP (TCP port 25), DNS (TCP port 53), HTTP (TCP port 80), Kerberos (TCP port 88), POP3 (TCP port 110), NNTP (TCP port 119), NTP (TCP port 123), IMAP (TCP port 143), LDAP (TCP port 389), HTTPS (TCP port 443) and RDP (TCP port 3389). These ports are non-editable, and are used purely to provide an insight into the Hosts so that you can choose to add the relevant Host templates to the Hosts once the scan has completed.

-
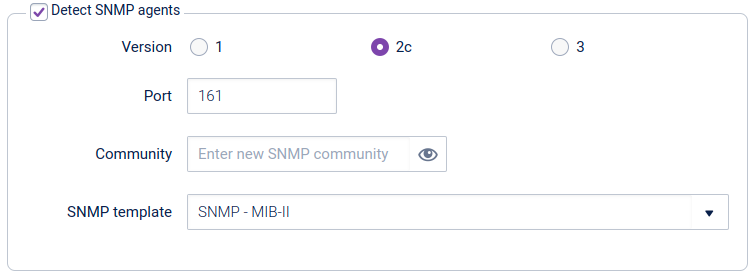
Detect SNMP agents — if this option is checked, then the Autodiscovery scanner will attempt to authenticate and communicate with each Host via SNMP using the credentials specified. If no hostname can be resolved for a Host via DNS, then the SNMP sysName will be used if that is a valid hostname. If the Autodiscovery scanner is successful in authenticating and communicating, it will apply the specified Host template, which is ‘SNMP - MIB-II’ by default. Note that the ‘aes256’ and ‘aes256c’ SNMPv3 privacy protocol options are only fully supported on some operating systems (see SNMP Privacy Protocol Support).
-
Detect Host agents — if this option is checked, then the Autodiscovery scanner will check each discovered Host to see if it is running either an Opsview Agent or a version of NRPE/NSClient. If the Autodiscovery scanner detects an Opsview Agent on Windows, for example, it will apply the ‘OS ’ Windows Base’ template by default.

-
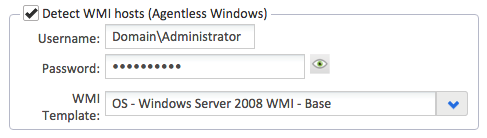
Detect WMI Hosts (Agentless Windows) — if this option is checked the Autodiscovery scanner will check if the Host is running WMI and that it can authenticate using the credentials provided. If the Autodiscovery scanner is successful in authenticating against the detected Host it will apply the specified Host template; ‘OS ’ Windows Server 2008 WMI ’ Base’ by default.
-
Detect VMware Hosts — if this option is checked the Autodiscovery scanner will check if the Host discovered is a VMware Host. If it is, it will assign the specified Host template; ‘OS ’ VMware vSphere ’ Host’.

Note
You will need to configure more data for VMware hosts before it is imported - details in the Updating a Single Host section below.
Scheduler Copied
You can choose to re-run the same scan on a regular basis to discover more hosts that may have been added in a certain timeframe. Within the ‘Scheduler’ drawer, you have the option to tell Autodiscovery to run the configured Network Scan at a recurring interval, e.g. every day at 23:00, or every Monday at 12:00.
You can enable or disable scheduling using the ‘Set up Schedule for Scan’ checkbox. In the example below the scan is set to run every Saturday evening at 19:00 and only the last 10 scan results will be preserved:
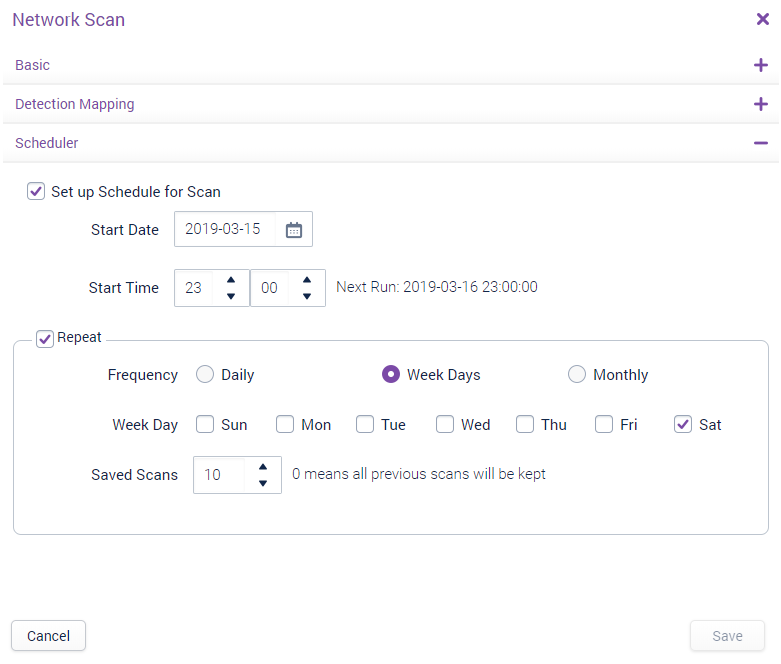
With scheduled scans, the time specified will be based on your browser’s time zone. When this is saved to Opsview, this will be stored in the UTC time zone. Scheduled scans will have the time of execution appended to the scan name, e.g. My Scan (2018-09-10 16:05) - this time will be in the UTC time zone.
Saving your Scan configuration Copied
Once the options have been configured within the scan, click on Save. Your new scan appears in the Scan Management grid.

Configuring a VMware Scan Copied
A VMware scan is similar to a Network Scan, but instead of specifying a network range, you point at a set of VMware hosts so Opsview will then retrieve the list of VMware guests to get a list of IP addresses to scan.
If Opsview Monitor does not have a Host with the host variable VMWAREHOSTCREDENTIALS associated to it, then the ‘VMware Scan’ button will display this window:
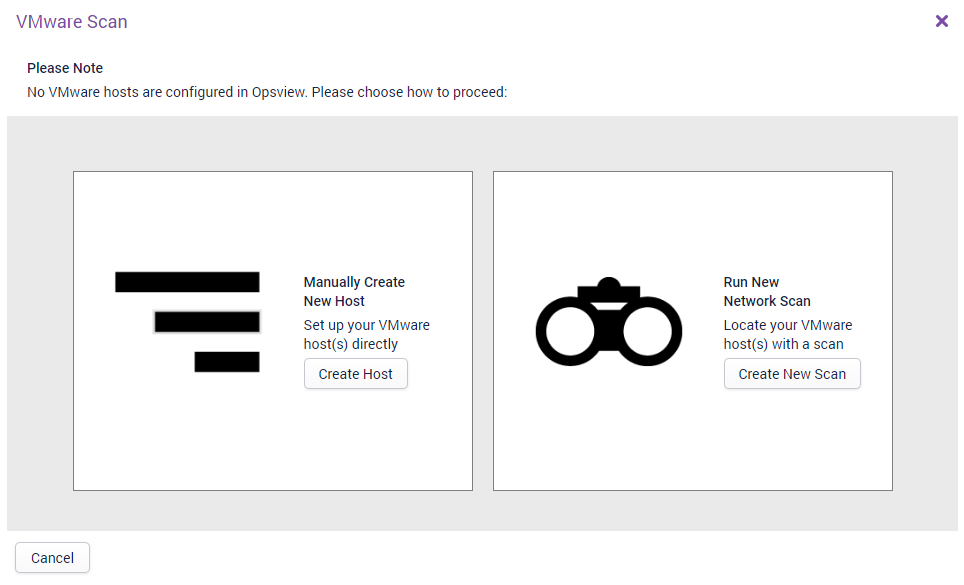
There are two ways to add a VMware Host:
- Create Host — this will take you into the Host Edit screen, with some fields already prepopulated for a VMware host.
- Create New Scan — you can create a new Network Scan to detect a VMware Host and import into Opsview.
Once a VMware Host has been added to the system, the VMware Scan button will display the modal configuration window as shown below:
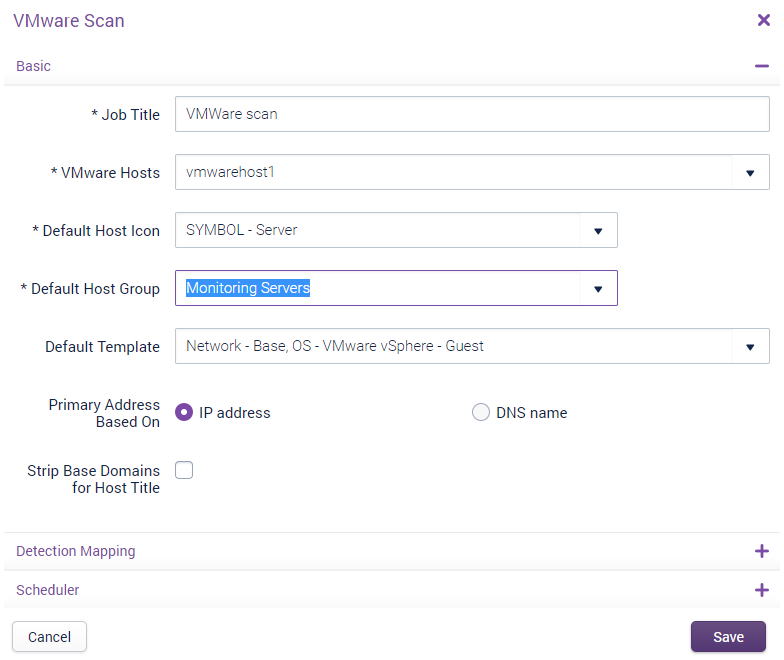
This VMware Scan is very similar to the Network Scan, with the main difference being the ‘VMware Hosts’ drop-down option within Basic, which allows users the ability to specify which VMware Hosts they would like to run the VMware Scan against.
The Detection Mapping drawer is the same as that in Network Scan, aside from the omission of the VMware section as we cannot detect for VMware Hosts running atop of a VMware Host.
Once configured, the VMware Scan will run in the same way as a Network Scan in terms of behavior and statuses/options. The main difference for VMware Scans vs Network Scans is that a VMware Scan detects guests via the API and not via ping, meaning that if a VMware guest has ping disabled but is ‘online’, the VMware scan will still detect and display it within the scan results.
VMware SDK The monitoring and Autodiscovery of VMware Hosts/guests is performed via the VMware SDK. If you attempt to run a VMware Scan without first installing the VMware SDK, a warning message will appear:
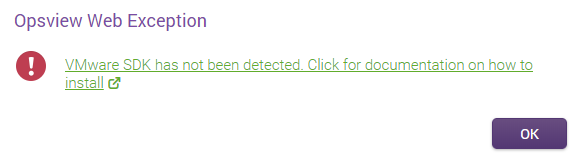
To remedy this issue, see the OS - VMware vSphere - Guest integrations page for instructions on how to install the VMware SDK.
Configuring a Windows Scan Copied
A Windows scan builds on a Network Scan and a VMware Scan, but makes it easier to configure as basic options are chosen for you. All you have to do is point it at a preconfigured Windows Active Directory server so Opsview Monitor can retrieve a list of IP addresses to scan.
If the Opsview system does not have a Host with the host variable WINLDAP_CREDENTIALS associated to it, then the Windows Scan button will display this window:
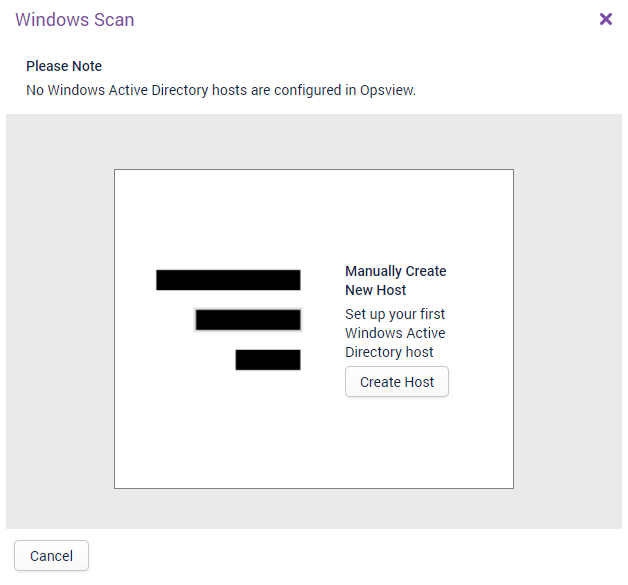
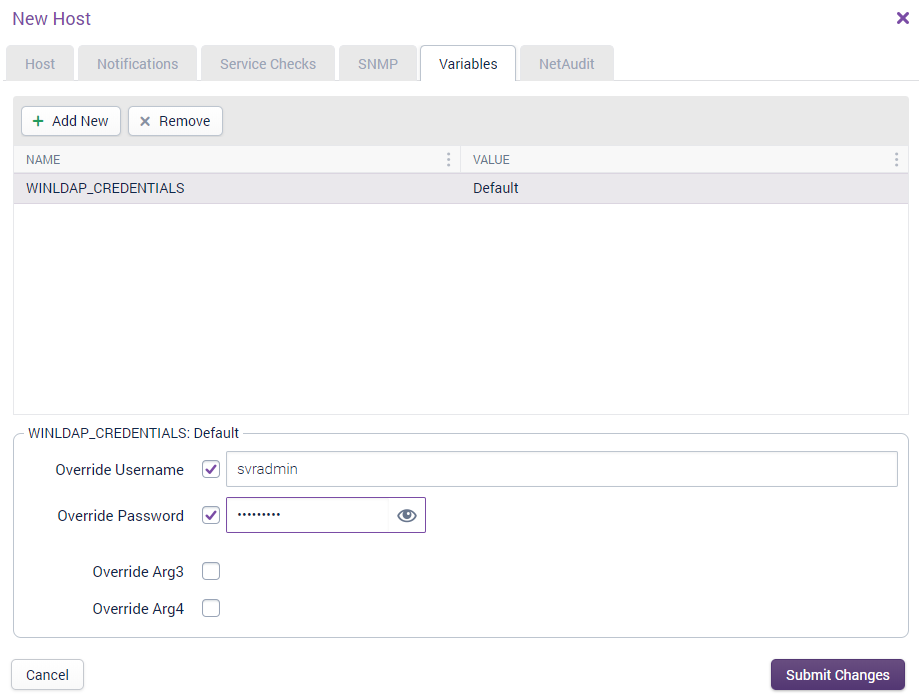
Click on the Create Host button to be taken to Opsview Monitor’s Host Edit screen, with some fields prepopulated:
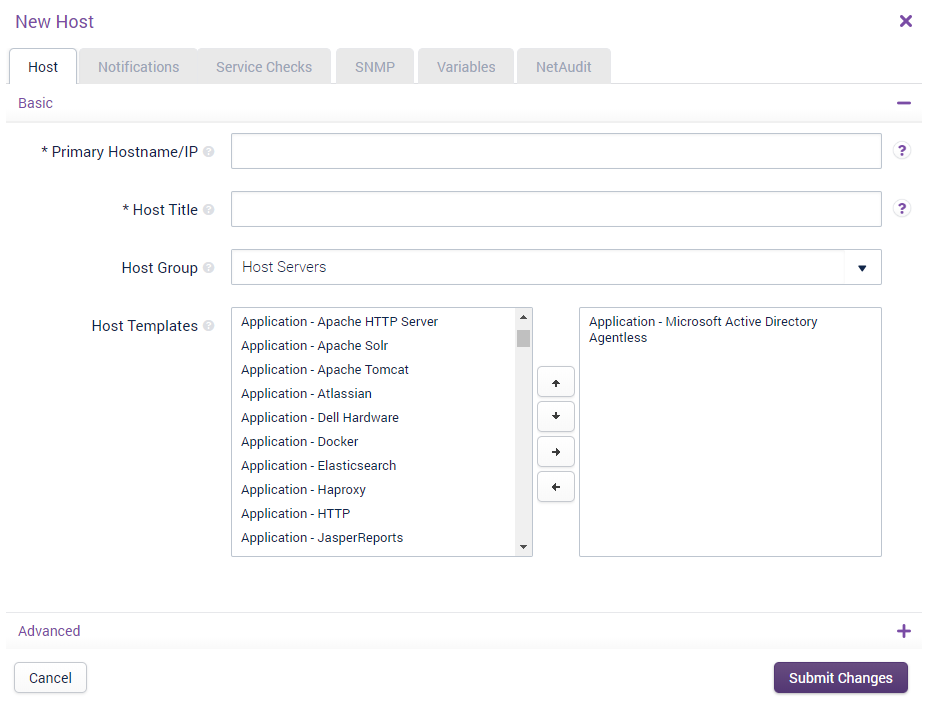
You will need to enter a hostname or IP address, the name and, in the Variables tab, the username and password to connect to the Windows server:
After submitting the changes, you will be taken back to Autodiscovery and the configuration window for a Windows Scan is displayed:
Select the Windows Active Directory server and press Start Scan.
In the background, this will work as a Network Scan but with the following options preconfigured:
- Scan name is set to “Windows Scan YYYY-MM-DD HH:mm:SS”.
- Detect network services enabled.
- Detect host agents enabled.
- Host group is set to the same host group that this Windows Active Directory server is in.
- Run on is set to the same as the same monitoring cluster that the Windows Active Directory is associated with.
When you press Start Scan, the scan is automatically moved from a Configured state to a Pending state and will be picked up by the Autodiscovery scanner.
At the end of the scan, the results window will be available, as with other types of scans. It is not possible to schedule Windows scanning at this point.
Note
One of the prerequisites for a successful Windows Scan is a properly configured DNS. If a hostname or IP address cannot be resolved via either DNS or the/etc/hostsfile of the master/collector performing the scan then the following error will be shown:WARNING: Failed to resolve 'host.ad.domain.com': Authentication may also fail.
If DNS cannot resolve your Windows Active Directory server then it is necessary to manually add an entry for the Windows Active Directory server into the /etc/hosts file on the master and all collectors performing Windows Scans.
Other actions Copied
There are two other buttons in the top toolbar:
Stop All Scans Copied
Stops all scans that are currently running. This does not affect scans that have been created (‘Configured’) but not run, nor scans that have completed
Exclusion List Copied
You can configure a list of IP addresses to be excluded from being scanned. This list is designed to provide you with the ability to specify single IPs or IP ranges that are omitted when a Scan is running. Valid syntax examples include ‘10.10.10.10’ (single IP), or ‘10.10.10.10/24’ (IP range using CIDR notation).
When clicking on the Exclusion List button, this will load:
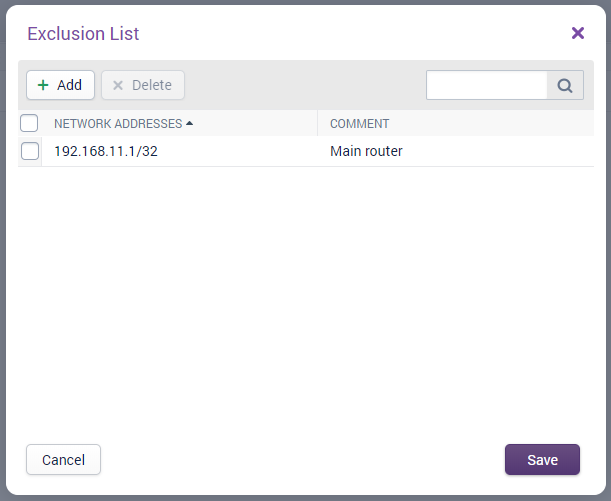
In the above example, we have chosen to add the IP address 192.168.11.1 to the Exclusion List. This means that if you configured a scan in the future for a subnet containing 192.168.11.1, such as ‘192.168.11.0/24’, then the Autodiscovery scan will skip that IP address. This is a great piece of functionality for customers who have IDS (Intrusion Detection Systems) or IPS (Intrusion Prevention Systems) that have the ability to generate notifications or black-list IP’s when Autodiscovery is run against sensitive Hosts (as Opsview is effectively a network and port scanner).